Thursday, September 2, 2010

DIY DNA

My father died when I was 10 years old. Today is the anniversary of his death.

I don't dwell upon this much -- most years I don't even think about it until a couple of days later. I have few fond memories; few memories, actually. His death sent our family into a financial hole that he could have prevented with better insurance. He was older, had heart trouble, and, as they say, was pretty emotional unavailable - a product of his day.

When he died, he had just finished rehabbing the attic of our home. We bought it two years before, and he tackled the reno with gusto. I remember him using hand saws. Stuffing insulation into attic eaves. Putting up drywall.

Dad updated a half bath, created a back room and put in a drop ceiling. I helped a lot as a nine-year-old would: grabbing tools for him, running up and down the stairs and watching him as he measured and planned.

Flash forward. Here I am, stuffing insulation, using hand saws, and measuring (although probably not as successfully). Not a bad legacy.

And, just a little bit, I envy the friends whose fathers are around to help them with a renovation


Saturday, July 31, 2010

Get this party started?

I'm hosting a post-nuptial party for some good friends next week. So how will I explain my unfinished projects? Or should I?

I mean, people know me. They know I'm constantly working on my house.

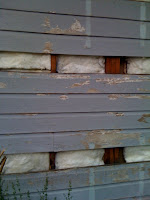
Right now, the walls of my laundry room are partially exposed as I tear down siding for my exterior painting project (currently on hold until summer ends its simmering). And there's the slightly disassembed post in the bathroom.

Then there's the repairs unrepaired: the siding still unpainted, the eave that's rotting away along the back porch. The low spots in the yard. I notice all these things, everyday. Will anyone notice them during an evening's festivities?

How do you entertain while remodeling?

Monday, July 5, 2010

Tarred and weathered

After painting of a third side of my house, I wanted to take a breather until I did the finishing touches. Time to inhale.

The mid-summer weather in the South makes it forgivable to neglect work outside. When the humidity is 90 percent and it's about 95 degrees, you huddle inside as if a Nor'easter was roaring through.

But last weekend, it was in the 80s during the day, and even a bit chilly at night. Glorious. I split the difference outdoors as a result. I spent one lazy afternoon in the hammock, catching up on reading that wasn't a requirement of my night classes. Then, this morning, I shimmied up a ladder and installed a drip edge near the roofline.


Why didn't I do this before? The L-shaped channel is designed to direct water from the roof to a gutter, but, in my case, it's a perfect solution to keep my rafters in good shape and even protect a few vulnerable spots. It also improves the look of an older roofline.

It was easy to put up. The thin aluminum makes the drip edge flexible -- you tuck it in between the bottom shingle and the roof. Adhere it with roofing cement (with a caulk gun) by running a bead over the channel and pressing the shingles to the channel. Be careful pulling up the shingles -- if they're older they'll crack a bit (I used extra roofing cement to repair those tiny cracks).

This break in the weather was just a break. It'll be 100 degrees here by Wednesday. Time to head back inside.

Monday, June 14, 2010

TA-DA! Three sides re-painted.


The next side of the house is (technically) finished. Just some touch-ups and such.

The siding transplant was a success -- in that I didn't screw much up. Now, a break for a long hot summer. Might start repairing the gaping holes I made in interior walls in the laundry room.


Wednesday, May 26, 2010

Not so level-headed


Been celebrating my 50th birthday over the last couple of weeks -- I call it Betseyfest -- so I haven't been as diligent about projects.

My brother and sister visited prior to my birthday. Part of their gift was to help me with one little project -- installing new closet doors.

Sliding doors, from Lowe's, check.

Tools, check.

Level framed opening? Not so check.


My brother was determined to make it work. So out came the shims. A few (six, seven, who's counting?) shims later, we leveled the top frame. He fudged the bottom by cutting it at a small angle, and I provided the know-how to plug the bottom of the hollow doors (thank you, DIY Network!).

I just need to put a piece of wood to cover the framing, but it looks pretty good.

Friday, May 7, 2010

Operation Siding Transplant: Update


I began Operation Siding Transplant last week. So far, so good. So good, that in fact, I decided to add Operation Insulation, MacGyver style.

A couple of nights ago, I started peeling away some damaged siding, and I dutifully began fitting the donor siding in the empty space. Thankfully, they fit, but I didn't nail them in just yet.

I was thinking, Hey, while I've got the outside cavity open, why don't I look at the options of adding insulation? A couple of minutes on the Internets, and I had a plan.

The next morning I called the insulation company I used to blanket my attic. The salesman said they didn't do retrofit work, but explained how to get it done.


First, I peeled away a few more boards of siding to reveal some of the framing toward the top and the bottom.


Next, I unfurled the insulation (kraft paper backed, 23 inches wide, and 3 1/2 in depth) and began cutting to size. I got the right size by fishing my measuring tape into the cavity. After cutting the insulation to match the cavity, I slowly stuffed it in. On the full lengths, I stuffed them in increments, so I didn't have too long of a piece to navigate through the hole.

I'm about finished -- still have to stuff the space above the windows and figure out how to get into spaces that now are obstructed by pipes (such as a kitchen vent), but I'm pretty confident I can finish this up, button up the holes with the donor siding, then prime and paint. And voila, I will have three sides of my house painted.

Some tips:
-- I'm in the South, but the insulation folks recommended that I buy insulation with a vapor barrier, and face that toward the interior walls.
-- I hope the wood studs don't sweat and cause condensation within the cavity.
-- Don't work on insulation when it's 90 degrees out. Oy.
-- Take a break, so you don't make mistakes out of sheer exhaustion.


Sunday, April 4, 2010

Carpenter bees!


Spring is in full force here. Azaleas blooming, hosta shoots peeking, and bees buzzing. Unfortunately, the bees are of the carpenter kind.

I learned this after two random observations: a bee staying put near my hydrangeas, even though they weren't blooming yet. And little piles of sawdust under my railing.

I was enchanted by watching the bee just hover near the bush, but then I began to suspect it was protecting something -- especially when other bees would come near. It's a hive, I thought, built under the siding that's curled away from the building, damaged from all the Southern sun.

A consultation later at work, followed by some Internet research, revealed the world of carpenter bees. They burrow into exposed wood, use the sawdust for nests, and thrive inside a round hole that they create.

I found a perfectly round hole, but I also suspect they just had an open door -- or siding -- policy. I'm sanding and prepping the siding, exposing patches of bare wood. And the railings? I don't know how they did it, but they're hollowing out the bottom of the rails.

I reluctantly bought some insecticide (I believe we use way too many toxic chemicals in this world) and shot it through any opening I can find. The bees should be gone in two days. Or onto another part of my house.

To prevent them, I'll have to paint and caulk and replace some of the siding boards. They don't like painted wood. I'm on that, as soon at the pine pollen stops dusting everything in sight.