I began Operation Siding Transplant last week. So far, so good. So good, that in fact, I decided to add Operation Insulation, MacGyver style.
A couple of nights ago, I started peeling away some damaged siding, and I dutifully began fitting the donor siding in the empty space. Thankfully, they fit, but I didn't nail them in just yet.
I was thinking, Hey, while I've got the outside cavity open, why don't I look at the options of adding insulation? A couple of minutes on the Internets, and I had a plan.
The next morning I called the insulation company I used to blanket my attic. The salesman said they didn't do retrofit work, but explained how to get it done.

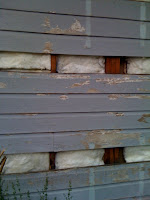
First, I peeled away a few more boards of siding to reveal some of the framing toward the top and the bottom.
Next, I unfurled the insulation (kraft paper backed, 23 inches wide, and 3 1/2 in depth) and began cutting to size. I got the right size by fishing my measuring tape into the cavity. After cutting the insulation to match the cavity, I slowly stuffed it in. On the full lengths, I stuffed them in increments, so I didn't have too long of a piece to navigate through the hole.

I'm about finished -- still have to stuff the space above the windows and figure out how to get into spaces that now are obstructed by pipes (such as a kitchen vent), but I'm pretty confident I can finish this up, button up the holes with the donor siding, then prime and paint. And voila, I will have three sides of my house painted.
Some tips:
-- I'm in the South, but the insulation folks recommended that I buy insulation with a vapor barrier, and face that toward the interior walls.
-- I hope the wood studs don't sweat and cause condensation within the cavity.
-- Don't work on insulation when it's 90 degrees out. Oy.
-- Take a break, so you don't make mistakes out of sheer exhaustion.


No comments:
Post a Comment